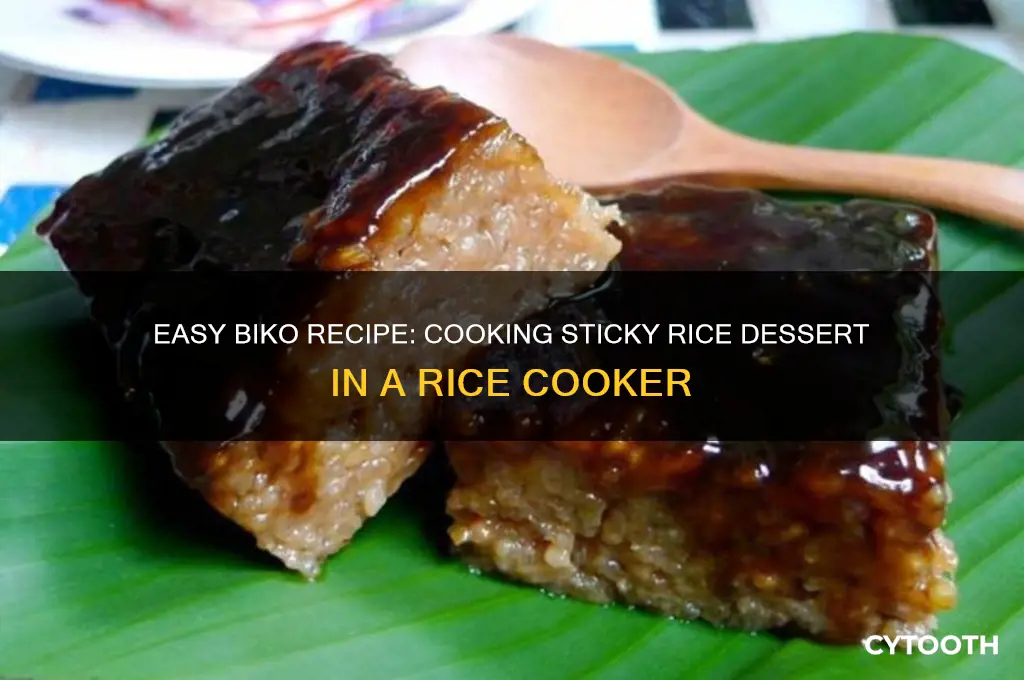
Cooking biko, a traditional Filipino sweet rice cake, using a rice cooker is a convenient and foolproof method that simplifies the process while maintaining the dish’s authentic flavor. By combining glutinous rice, coconut milk, brown sugar, and a pinch of salt, the rice cooker handles the cooking process seamlessly, eliminating the need for constant stirring or monitoring. This approach not only saves time but also ensures a perfectly sticky and creamy texture, ideal for biko. Whether you’re a beginner or a seasoned cook, using a rice cooker to make biko guarantees a delicious, hassle-free treat that’s perfect for any occasion.
What You'll Learn
![]()
Preparing the Rice and Coconut Milk
The foundation of a perfect biko lies in the harmonious marriage of rice and coconut milk. This duo demands precision: too much liquid, and your biko turns soggy; too little, and it becomes dry and crumbly. The rice cooker, with its automated heating and timing, simplifies this delicate balance, but understanding the ratio and technique is key. For every cup of glutinous rice, use 1.5 cups of coconut milk and 1 cup of water. This proportion ensures the rice absorbs enough liquid to become tender without becoming mushy.
Consider the coconut milk’s consistency—thick, creamy varieties yield richer biko but require careful monitoring to prevent scorching. If using canned coconut milk, shake the can vigorously before measuring to distribute the solids evenly. For a lighter texture, dilute it with water or use a thinner, fresh coconut milk variant. The rice cooker’s even heat distribution minimizes the risk of burning, but stirring halfway through cooking helps prevent the mixture from sticking to the bottom.
Glutinous rice, the star of biko, requires a specific treatment. Unlike regular rice, it thrives on absorption rather than steaming. Rinse it thoroughly under cold water until the water runs clear to remove excess starch, which can make the biko gummy. Soak the rice for at least 30 minutes (or up to 4 hours for a softer texture) before cooking. This step is non-negotiable—it ensures the rice cooks evenly and achieves the desired stickiness.
The coconut milk’s role extends beyond moisture; it imparts a rich, tropical flavor that defines biko. To enhance this, add a pinch of salt to the coconut milk mixture before pouring it into the rice cooker. Salt not only balances the sweetness but also elevates the coconut’s natural aroma. For a deeper flavor profile, toast a few tablespoons of grated coconut and sprinkle it over the biko before serving.
Finally, trust the rice cooker’s timing but remain vigilant. Most models take 20–25 minutes to cook biko, but the exact duration depends on the rice cooker’s wattage and the coconut milk’s thickness. Once the cooker switches to "warm," let the biko sit for 10 minutes to allow the rice to fully absorb the liquid. This resting period is crucial—it transforms a good biko into a great one, ensuring every grain is perfectly cooked and every bite is delightfully cohesive.
CycleBar's Bike Brand: Unveiling the Ultimate Indoor Cycling Experience
You may want to see also
![]()
Setting Up the Rice Cooker
The rice cooker, a staple in many kitchens, transforms the traditional biko-making process into a more streamlined affair. Before diving into the sticky sweetness of this Filipino delicacy, proper setup is key. Begin by selecting a rice cooker with a non-stick inner pot to prevent the rice from sticking and burning, a common pitfall when cooking biko. Ensure the cooker’s capacity matches your recipe—typically, a 3-cup rice cooker is ideal for a small batch, while larger families might opt for a 5-cup model.
Next, measure your ingredients with precision. For every 2 cups of glutinous rice, use 2 ½ cups of coconut milk and 1 cup of water. This ratio ensures the rice absorbs enough liquid to achieve the desired sticky texture without becoming mushy. Rinse the rice thoroughly under cold water until the water runs clear to remove excess starch, then soak it for at least 30 minutes. This step is crucial for even cooking and optimal consistency.
Once the rice is prepped, layer it into the rice cooker’s inner pot. Pour the coconut milk and water mixture evenly over the rice, taking care not to stir, as this can disrupt the cooking process. Add ½ cup of brown sugar (or white sugar if preferred) and a pinch of salt to enhance the flavor. The sugar will caramelize slightly during cooking, contributing to biko’s signature sweetness.
Before closing the lid, consider adding a banana leaf lining the pot for an authentic touch. Not only does it impart a subtle aroma, but it also prevents sticking and adds a traditional flair. If banana leaves are unavailable, a light coating of cooking spray or oil will suffice. Secure the lid, ensuring it’s properly sealed to trap steam, and select the “Cook” or “White Rice” setting.
Finally, resist the urge to open the lid during cooking, as this releases steam and can affect the outcome. Most rice cookers will automatically switch to a “Warm” setting once the rice is cooked. Allow the biko to rest for 10–15 minutes before unmolding or serving. This resting period allows the flavors to meld and the texture to set, ensuring a perfect, cohesive dish. With these steps, your rice cooker becomes not just a tool, but a partner in crafting a delightful biko.
Easy Biko Recipe: Cooking with Coconut Powder for Perfect Results
You may want to see also
![]()
Adding Latik for Flavor
Latik, a coconut caramel sauce, is the secret weapon that elevates biko from good to unforgettable. This golden-brown syrup, made by reducing coconut milk and sugar, adds a depth of flavor that contrasts beautifully with the sweetness of the rice. While some recipes sprinkle latik on top as a garnish, incorporating it directly into the rice cooker during cooking infuses every grain with its rich, nutty essence.
Think of latik as the soul of biko, its flavor profile a delicate balance of sweet, salty, and slightly smoky. By adding it during the cooking process, you allow the rice to absorb its complexities, creating a dish that's not just sweet, but layered and intriguing.
To achieve this, add 1/4 cup of latik to the rice cooker along with the rice, coconut milk, sugar, and salt. This ratio ensures a noticeable presence without overwhelming the natural sweetness of the rice. Stir gently to distribute the latik evenly, allowing it to coat the grains and mingle with the coconut milk. As the rice cooks, the latik will caramelize slightly, deepening its flavor and creating a subtle golden hue throughout the dish.
For a more intense latik experience, reserve an additional 2-3 tablespoons to drizzle over the finished biko before serving. This final touch adds a glossy sheen and a concentrated burst of flavor, making each bite a delightful interplay of textures and tastes. Remember, latik is potent, so adjust the amount based on your preference for sweetness and intensity.
Cooking Biko: A Sweet Black Glutinous Rice Delight
You may want to see also
![]()
Cooking Time and Consistency
The cooking time for biko in a rice cooker typically ranges from 25 to 40 minutes, depending on the rice cooker model and the ratio of rice to liquid. Unlike plain rice, biko requires a longer cooking time to ensure the coconut milk and sugar are fully absorbed, creating a sticky, caramelized consistency. Most rice cookers will automatically switch to a "warm" setting once the liquid is absorbed, but it’s crucial to monitor the process to avoid burning the bottom layer. Stirring halfway through cooking helps distribute the coconut milk and sugar evenly, preventing clumping and ensuring a uniform texture.
Consistency is the hallmark of a well-made biko, and achieving it hinges on the right balance of ingredients and timing. The rice should be tender but not mushy, with each grain coated in a glossy, slightly thickened coconut-sugar syrup. If the mixture appears too dry during cooking, add ¼ cup of coconut milk or water incrementally, stirring gently to avoid breaking the grains. Conversely, if the biko is too wet after the cooker switches off, leave the lid open for 5–10 minutes to allow excess moisture to evaporate. The final product should hold its shape when pressed but yield easily when cut, striking a balance between sticky and firm.
A common mistake is overcooking, which can lead to a hardened, burnt layer at the bottom of the rice cooker. To prevent this, use the "keep warm" function sparingly and unplug the cooker once the biko reaches the desired consistency. Letting the biko rest for 10 minutes before unmolding allows it to set properly, ensuring clean edges and a cohesive texture. For those using older rice cooker models, manually checking the consistency after 20 minutes and adjusting the cooking time accordingly can save the dish from overcooking.
For a foolproof approach, consider the rice-to-liquid ratio: 2 cups of rice pairs well with 2 cups of coconut milk and 1 cup of water or coconut water for added flavor. This ratio ensures the rice cooks through without becoming soggy. Adding the sugar (1–1.5 cups, depending on sweetness preference) halfway through cooking allows it to dissolve gradually, reducing the risk of crystallization. Always use medium-grain rice, as its higher starch content contributes to the desired stickiness, whereas long-grain rice may result in a drier, less cohesive biko.
Finally, the cooling process plays a subtle but significant role in consistency. Once unmolded, let the biko cool at room temperature for 30 minutes before refrigerating. This gradual cooling preserves the texture, preventing the dish from becoming too hard or losing its sheen. For serving, a lightly greased spatula ensures clean cuts, showcasing the biko’s perfect consistency—a testament to patience and precision in the cooking process.
Choosing the Right Bike Size for Your 5-Year-Old Child
You may want to see also
![]()
Cooling and Serving Tips
Once your biko has finished cooking in the rice cooker, the temptation to dig in immediately is understandable, but patience is key. Allowing the biko to cool properly ensures it sets firmly, achieving that signature sticky yet sliceable texture. Transfer the rice cooker insert to a cooling rack or a heat-resistant surface. Let it sit undisturbed for at least 30 minutes with the lid on to trap the steam, which helps the coconut milk and sugar mixture bind evenly. For a quicker cool-down, especially in humid climates, place the insert in a larger pan filled with cold water, ensuring no water seeps into the biko.
The cooling process isn’t just about time—it’s also about technique. After the initial 30-minute rest, gently press the biko with a spatula to even out the surface and release any trapped steam. Then, let it cool completely at room temperature for another hour. If you’re in a rush, refrigerate it for 20–30 minutes, but avoid leaving it in the fridge too long, as this can dry out the rice. The goal is a biko that’s firm enough to slice but still retains its moist, chewy consistency.
Serving biko is an art that balances presentation and practicality. Use a sharp knife dipped in hot water to cut clean, even squares or diamonds. For a festive touch, sprinkle toasted sesame seeds, grated coconut, or latik (coconut caramel) on top. Serve it on a platter lined with banana leaves for an authentic Filipino flair, or in individual portions for ease. If the biko feels too soft after cutting, chill it in the fridge for 10–15 minutes to firm it up before serving.
Leftovers, if any, should be stored properly to maintain freshness. Wrap the biko tightly in plastic wrap or store it in an airtight container. It keeps well at room temperature for up to 2 days, but for longer storage, refrigerate for up to a week. To reheat, steam it for 5–7 minutes or microwave individual portions for 15–20 seconds, ensuring it regains its warmth without drying out. Proper cooling and serving techniques not only enhance the biko’s texture and flavor but also elevate it from a simple dessert to a memorable treat.
Frequently asked questions
Yes, you can cook biko directly in a rice cooker. It’s a convenient and easy method that yields delicious results.
Sticky rice (also known as sweet rice or glutinous rice) is the best choice for making biko in a rice cooker, as it gives the dish its signature chewy texture.
Use a 1:1 ratio of rice to water for biko in a rice cooker. For example, if using 2 cups of rice, add 2 cups of water, plus additional coconut milk as per the recipe.
Yes, soaking the sticky rice for at least 30 minutes to 1 hour before cooking helps ensure it cooks evenly and achieves the right texture.
Cooking biko in a rice cooker typically takes about 20-25 minutes, depending on the rice cooker. Once done, let it sit for 5-10 minutes before serving or layering with caramelized coconut topping.